
Sitecorians, I hope you have a lovely summer or winter (depending on where you are in the world) 😉
Here in Europe, it’s the European championship(in football) – EURO 2020. Who will win? My team(Sweden) is unfortunately out So good luck and may the best country win.
Today’s post will be about using Github Packages to store Sitecore content as a NuGet package, with the power of SITECORE CLI and GITHUB ACTIONS.
The powerful SITECORE CLI, Sitecore Command Line Interface, is a great command tool that allows you to administer your Sitecore items. We will use it to pull Sitecore items and then create an SCS package – Sitecore Content Serialization package
Sitecore Content Serialization (SCS) packages (file extension
.itempackage) contain specified modules and all their serialized items. You use packages as build artifacts in your continuous integration pipeline by creating them in your build pipeline and installing them in your delivery pipeline.
Github Packages is great, it allows you to store all kinds of “package” types – Including NuGet packages 😉. We will use it to store our SCS package(Sitecore Content Serialization package) as a NuGet package.
GitHub Packages is a platform for hosting and managing packages, including containers and other dependencies. GitHub Packages combines your source code and packages in one place to provide integrated permissions management and billing, so you can centralize your software development on GitHub.
The orchestrator behind it all will be the wonderful and powerful – GitHub Actions.
GitHub Actions makes it easy to automate all your software workflows, now with world-class CI/CD. Build, test, and deploy your code right from GitHub. Make code reviews, branch management, and issue triaging work the way you want.
Ok friends, let’s begin!
First out is to create a self-hosted runner(agent) for the Github Actions. In our scenario, the administration of the site is restricted. Meaning no public access. Since we are pulling Sitecore items(content) from the site, GitHub Actions needs access to the site. Unfortunately, we can not use a GitHub-hosted runner, instead, we will create our own and host it “locally”. GitHub has great documentation on how to create a self-hosted runner, let’s follow the instructions:

Next up is setting up the workflow in GitHub Actions. We will create a workflow file and put it in .github/workflows, let’s call it GenerateContentPackage.yml. We want to run it manually, so we will go for the “workflow_dispatch”
name: Create backup content package

on:
  workflow_dispatch:

jobs:
Instead of having one big job, we will split the workflow into smaller jobs:
– Pull Sitecore items
– Build package
– Push package
The first job – Pull Sitecore items

The job will check out the repo code, login to the Sitecore site and get(pull) some Sitecore content.
To get the the login part to work, we need to configure the Identity Server and Content Management roles for a non-interactive client login. We just need to follow the instructions here – Configure a non-interactive client login. We will create an xml file, which will be placed in the identity server – Sitecore.IdentityServer.SandboxSite.xml:
<?xml version="1.0" encoding="utf-8"?>
<Settings>
	<Sitecore>
		<IdentityServer>
			<Clients>
				<!-- used to authenticate servers with client id and client secret -->
				<CliServerClient>
					<ClientId>SANDBOXSITE_Automation</ClientId>
					<ClientName>SANDBOXSITE_Automation</ClientName>
					<AccessTokenType>0</AccessTokenType>
					<AccessTokenLifetimeInSeconds>3600</AccessTokenLifetimeInSeconds>
					<IdentityTokenLifetimeInSeconds>3600</IdentityTokenLifetimeInSeconds>
					<RequireClientSecret>true</RequireClientSecret>
					<AllowOfflineAccess>false</AllowOfflineAccess>
					<AllowedGrantTypes>
						<!--
                    client_credentials authenticates with client ID and client secret
                    which is good for CI, tools, etc. However, it's not tied to a USER,
                    it's tied to a client ID.
						-->
						<AllowedGrantType1>client_credentials</AllowedGrantType1>
					</AllowedGrantTypes>
					<ClientSecrets>
						<ClientSecret1>PlaceholderForClientSecret</ClientSecret1>
					</ClientSecrets>
					<AllowedScopes>
						<!-- this is required even if not a 'user' for Sitecore to like us -->
						<AllowedScope3>sitecore.profile.api</AllowedScope3>
					</AllowedScopes>
				</CliServerClient>
			</Clients>
		</IdentityServer>
	</Sitecore>
</Settings>
*Notice the PlaceholderForClientSecret, it will allow us to set the secret at “runtime”. Works in docker compose and in the k8’s specs. Just love it! Want to read more about the powerful PlaceholderFor? Check out my blog – Handle your json configs in your Sitecore Commerce Solution like Ripley(in Alien)
Thanks to docker, we can easily add the xml file when we build the Identity Server image. Here is our docker file for the Identity Server:
# escape=`

ARG BASE_IMAGE

FROM ${BASE_IMAGE}

SHELL ["powershell", "-Command", "$ErrorActionPreference = 'Stop'; $ProgressPreference = 'SilentlyContinue';"]

WORKDIR C:\Identity

# Copy identity artifacts
COPY wdp/ .

ENTRYPOINT ["dotnet", "Sitecore.IdentityServer.Host.dll"]
*Notice that we are copying files from folder wdp. That is where the xml file, Sitecore.IdentityServer.SandboxSite.xml, is placed.
Great, let’s proceed with the yaml for – Pull Sitecore items:
pull-content:
  name: Pull sitecore items
  runs-on: self-hosted

  steps:
  - name: Checkout
	uses: actions/checkout@v2

  - name : Create module.json file
	id: create-json-module
	uses: jsdaniell/create-json@1.1.2
	with:
	  name: 'Content.module.json'
	  dir: 'VisionsInCode.Sitecore/src/Project/SandboxSite/'
	  json: '{"namespace": "Project.Content", "items":{"includes":[{"name":"Images","path":"/sitecore/media library/Project/VisionsInCode/Sites/SandboxSite","database": "master"},{"name": "Content","path": "/sitecore/content/VisionsInCode/Sites/SandboxSite","database": "master"}]}}'

  - name : Pull content from cm
	shell: powershell
	run: |
			# Add nuget source & install Sitecore CLI
			dotnet nuget add source https://sitecore.myget.org/F/sc-packages/api/v3/index.json --name "Sitecore-Public-Nuget-Feed"
			dotnet tool install --add-source=https://sitecore.myget.org/F/sc-packages/api/v3/index.json --version 2.0.0 sitecore.cli --local

			# Login to ID Server
			dotnet sitecore login --client-credentials true --auth https://id.visionsincode.localhost/ --cm https://cm.visionsincode.localhost/ --allow-write true --client-id "SANDBOXSITE_Automation" --client-secret "my_secret_garden"

			# Pull Content
			dotnet sitecore ser pull -i Project.Content
Let me break it down for you:
pull-content:
  name: Pull sitecore items
  runs-on: self-hosted

  steps:
Here we set the job, and instruct it to use the self-hosted runner(we created earlier).
  - name: Checkout
	uses: actions/checkout@v2
This step checks out the repo code
  - name : Create module.json file
	id: create-json-module
	uses: jsdaniell/create-json@1.1.2
	with:
	  name: 'Content.module.json'
	  dir: 'VisionsInCode.Sitecore/src/Project/SandboxSite/'
	  json: '{"namespace": "Project.Content", "items":{"includes":[{"name":"Images","path":"/sitecore/media library/Project/VisionsInCode/Sites/SandboxSite","database": "master"},{"name": "Content","path": "/sitecore/content/VisionsInCode/Sites/SandboxSite","database": "master"}]}}'
Next step will be to create a module.json file. (We don’t want it to be included in the github repo, instead we are creating it on the fly) The file will contain the paths to the content, which is needed for the next step.
  - name : Pull content from cm
	shell: powershell
	run: |
			# Add nuget source & install Sitecore CLI
			dotnet nuget add source https://sitecore.myget.org/F/sc-packages/api/v3/index.json --name "Sitecore-Public-Nuget-Feed"
			dotnet tool install --add-source=https://sitecore.myget.org/F/sc-packages/api/v3/index.json --version 2.0.0 sitecore.cli --local

			# Login to ID Server
			dotnet sitecore login --client-credentials true --auth https://id.visionsincode.localhost/ --cm https://cm.visionsincode.localhost/ --allow-write true --client-id "SANDBOX_Automation" --client-secret "my_secret_garden"

			# Pull Content
			dotnet sitecore ser pull -i Project.Content
The last step will pull/get content from the Sitecore site. First, we install Sitecore CLI, the command tool which allows us to administer Sitecore content(items). But before the job can start pulling/downloading content, it needs to login – the non-interactive client login(we set up earlier). The last part will be to download selected content, following “instructions” from the newly created module.json file (-i Project.Content).
The second job – Build package

As it says, it’s all about building/creating packages. The job will create a Sitecore SCS package from the downloaded content(from the previous job) and add the created SCS package to a NuGet package.
Here is the YAML for the second job – Build package:
build-package:
  needs: pull-content
  name: Build package
  runs-on: self-hosted

  steps:

  - name : Create Sitecore Content Serialization package
	shell: powershell
	run: |
			dotnet sitecore ser package create -o BackupContent/nuget/SandboxSiteContent -i Project.Content


  - name : Update nuspec file
	shell: powershell
	run: |
			$con = Get-Content .\BackupContent\nuget\SandboxSiteContent.nuspec
			$con | % { $_.Replace("<version>1.0.0</version>", "<version>1.${{ github.run_number }}.0</version>") } | Set-Content .\BackupContent\nuget\SandboxSiteContent.nuspec


  - name : Generate nuget package
	shell: powershell
	run: |
			Invoke-Expression "./BackupContent/nuget.exe pack BackupContent/nuget/SandboxSiteContent.nuspec -Version 1.${{ github.run_number }}.0 -OutputDirectory BackupContent"
Once again let me break it down for you:
build-package:
  needs: pull-content
  name: Build package
  runs-on: self-hosted

  steps:
Create the job and instruct it to use the self-hosted runner. For the job to work, the previous job needs to be executed. Using “needs” will tell what job it depends on(pull-content).
  - name : Create Sitecore Content Serialization package
	shell: powershell
	run: |
			dotnet sitecore ser package create -o BackupContent/nuget/SandboxSite -i Project.Content
In the first step, we will create the Sitecore Content Serialization package. The param -o, will tell where to place the package and the name of the package(BackupContent/nuget/SandboxSite). The param -i (Project.Content), instructs it to ONLY use content specified in the module.json file, Content.module.json (created in the previous step).
  - name : Update nuspec file
	shell: powershell
	run: |
			$con = Get-Content .\BackupContent\nuget\SandboxSiteContent.nuspec
			$con | % { $_.Replace("<version>1.0.0</version>", "<version>1.${{ github.run_number }}.0</version>") } | Set-Content
In this step, we will update the nuspec file with version number using github.run_number.
*The idea is to generate a nuget package and for that we need a nuspec file, SandboxSiteContent.nuspec. The nuspec file will is located in the repo, in the following (folder) structure:
BackupContent
— nuget.exe
— nuget
—- SandboxSiteContent.nuspec
Let’s have a look at the SandboxSiteContent.nuspec file:
<?xml version="1.0"?>
<package xmlns="http://schemas.microsoft.com/packaging/2011/10/nuspec.xsd">
  <metadata>
    <id>SandboxSiteContent</id>
    <version>1.0.0</version>
    <authors>Sandbox</authors>
    <owners>Sandbox</owners>
    <requireLicenseAcceptance>false</requireLicenseAcceptance>
    <description>SandboxSite content - SCS package</description>
    <releaseNotes></releaseNotes>
    <copyright>2021</copyright>
    <tags></tags>
    <contentFiles>
      <files include="**\*.*" buildAction="Content" copyToOutput="true" />
    </contentFiles>
    <repository type="git" url="https://github.com/VisionsInCode/SandboxSite" />
  </metadata>
  <files>
    <file src="*.*" target="sitecore" />
  </files>
</package>
*without the repository element, we will not be able to push the nuget package to GitHub Packages
  - name : Generate nuget package
	shell: powershell
	run: |
			Invoke-Expression "./BackupContent/nuget.exe pack BackupContent/nuget/SandboxSiteContent.nuspec -Version 1.${{ github.run_number }}.0 -OutputDirectory BackupContent"
In the last step we will create
In the last step, we will create the NuGet package. With the parameter -OutputDirectory BackupContent, we tell where the NuGet package should be placed.
*When the job is executed we will have a new shiny NuGet package containing some lovely Sitecore content 😀
The last job – Push package

The nuget package will be pushed to GitHub Packages
Here is the yaml:
  push-package:
      needs: [pull-content,build-package]
      name: Push package
      runs-on: self-hosted

      steps:
      - name : Push nuget package to Github Packages
        shell: powershell
        run: |
                if (-not $(Get-PackageSource -Name "VisionsInCode" -ProviderName NuGet -ErrorAction Ignore))
                {
                  ./BackupContent/nuget.exe source Add -Name "VisionsInCode" -Source "https://nuget.pkg.github.com/VisionsInCode" -UserName ${{secrets.A_USER_NAME}} -Password ${{secrets.REPO_PAT}}
                }
                ./BackupContent/nuget.exe push  BackupContent/SandboxSiteContent.1.${{ github.run_number }}.0.nupkg -Source "VisionsInCode" -ApiKey ${{secrets.NUGET_PACKAGE_TOKEN}}
Notice that the job is dependent on previous jobs, pull-content and build-package.
In the single step, we will do the following:
- Check if the source is set for the nuget package. If not, we set the source https://nuget.pkg.github.com/VisionsInCode, with user name and a personal access token.
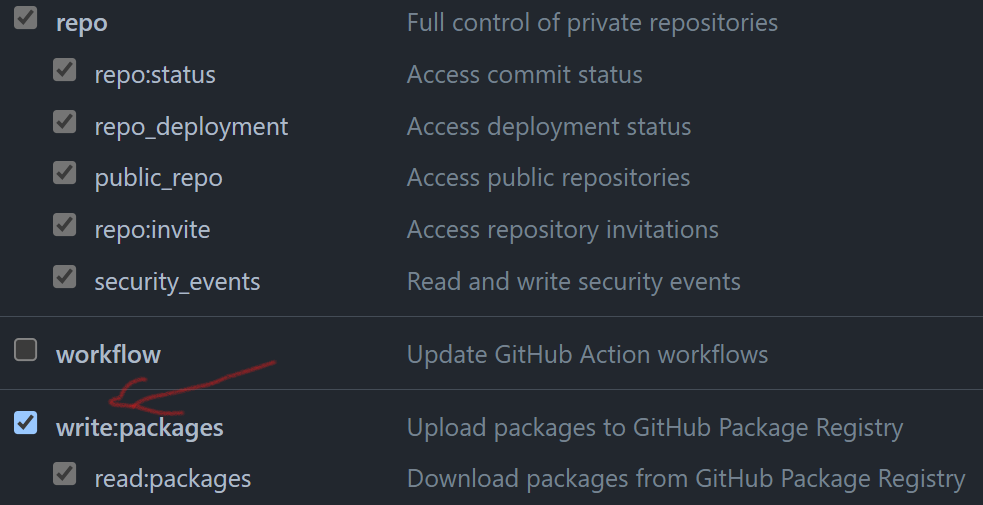
- Push the package to GitHub packages, in order to get access we need to set an ApiKey. It’s a normal access token with the access rights, write:packages:
When the workflow has run we should have a nice fresh nuget package in Github Packages. Let’s have a look 😀


Success!!
That’s all for now folks 😀

3 thoughts on “Use Github Packages for storing Sitecore content as a nuget package, with the power of SITECORE CLI and GITHUB ACTIONS”