Dear Sitecorians, I hope you are well out there, and I know that many of us are not well here in Europe. So my thoughts and prairies are with you, Ukraine.
Today’s post will be about running self-hosted GitHub Actions within your Kubernetes cluster. So what’s so special about that? Instead of setting up a “job” in your Kubernetes cluster, you can do the same work with a GitHub action or actions(you can scale the number of self-hosted runners).
Think about it. It’s like setting up a self-hosted runner on your local machine, which will have access to your local docker instances, say your Sitecore instance. Meaning you can do all sorts of cool things. Like setting up a local CI/CD pipeline(GitHub actions), no need for exposing id or cm. It’s all locally(within your cluster). You can call your local containers/pods using the pod names/container names, like cm, cd, id, etc. And best of all… You can use Sitecore CLI to do some serious “pushing” 🙂
So how do we do this? We will do this with… Actions-runner-controller.
GitHub Actions is a very useful tool for automating development. GitHub Actions jobs are run in the cloud by default, but you may want to run your jobs in your environment. Self-hosted runner can be used for such use cases, but requires the provisioning and configuration of a virtual machine instance. Instead if you already have a Kubernetes cluster, it makes more sense to run the self-hosted runner on top of it.
actions-runner-controller makes that possible. Just create a Runner resource on your Kubernetes, and it will run and operate the self-hosted runner for the specified repository. Combined with Kubernetes RBAC, you can also build simple Self-hosted runners as a Service.
What a lovely gem 🙂 I love GitHub actions and Kubernetes, so this is truly heaven. Thank you for this!
Let’s follow the instructions 🙂
In order to install/set up actions-runner-controller, we should install a cert-manager. We will do this with Helm.
Important! Don’t forget to tell what node(or node pool) it should run on(linux), we have both windows and linux nodes in our “Sitecore cluster”. Here we have set it to a node pool named “gitops” nodeSelector.agentpool=gitops
helm install `
  cert-manager jetstack/cert-manager `
  --namespace cert-manager `
  --create-namespace `
  --version v1.3.0 `
  --set installCRDs=true `
  --set nodeSelector.agentpool=gitops `
  --set cainjector.nodeSelector.agentpool=gitops  `
  --set webhook.nodeSelector.agentpool=gitops
Great! It’s time to install the actions-runner-controller. We will do this with Helm and don’t forget to tell what node/node pool it should run on – set nodeSelector.agentpool=gitops
We also need to authenticate to the GitHub API, –set=authSecret.github_token=YOUR PAT TOKEN
helm upgrade --install `
	--namespace actions-runner-system `
	--create-namespace `
    --set nodeSelector.agentpool=gitops `
	--set=authSecret.create=true `
	--set=authSecret.github_token=ghp_xxxyyyyyxxxyyyxxxyyyxyyy `
 	--wait actions-runner-controller actions-runner-controller/actions-runner-controller
Success! We have the actions-runner-controller installed :-). Now for the fun part! Let’s create a runner, self-hosted runner. We can do this in various levels:
- The repository level
- The organization level
- The enterprise level
We will go for the repository level 🙂
Next is to configure our runner(or runners), and there are a lot of options here:
- Have state in our runner/s using RunnerSets
- Scale our runner/s using RunnerDeployments
- Pull Driven Scaling with various metrics like TotalNumberOfQueuedAndInProgressWorkflowRuns, PercentageRunnersBusy
- Webhook Driven Scaling
Let’s try out the PercentageRunnersBusy
The
HorizontalRunnerAutoscalerwill poll GitHub for the number of runners in thebusystate which live in the RunnerDeployment’s namespace, it will then scale depending on how you have configured the scale factors.
And don’t forget to set the nodeselector. By default, the runner runs on Linux. We will set it to agentpool: gitops
apiVersion: actions.summerwind.dev/v1alpha1
kind: RunnerDeployment
metadata:
  name: runner-aks-linux-prod
spec:
  template:
    spec:
      nodeSelector:
        agentpool: gitops
      repository: myorganization/myverycoolrepo
---
apiVersion: actions.summerwind.dev/v1alpha1
kind: HorizontalRunnerAutoscaler
metadata:
  name: runner-aks-linux-prod-autoscale
spec:
  scaleTargetRef:
    name: runner-aks-linux-prod

  minReplicas: 1
  maxReplicas: 5
  metrics:
  - type: PercentageRunnersBusy
    scaleUpThreshold: '0.75'    # The percentage of busy runners at which the number of desired runners are re-evaluated to scale up
    scaleDownThreshold: '0.3'   # The percentage of busy runners at which the number of desired runners are re-evaluated to scale down
    scaleUpFactor: '1.4'        # The scale up multiplier factor applied to desired count
    scaleDownFactor: '0.7'      # The scale down multiplier factor applied to desired count
Now we are ready to deploy/set up the runner in our kubernetes cluster. So first, we will create a namespace, or we will use an existing one in our case. The reason for this is that I want the runner to run in the same namespace as my other “Sitecore” pods. It will allow the workflows to call the pods directly by using their “pod” name, like http://cm or http://id. Do you see what I’m getting at 🙂 Let’s visit this when we add Sitecore CLI to the workflow.
Back to the deploy command, here we will set up the runner. The yaml file is called self-hosted-linux-runner.yaml:
kubectl --namespace yoursitecorepodsnamespace apply -f self-hosted-linux-runner.yaml
Ok cool. Let’s have a look at the runner in Lens(best tool ever) 🙂
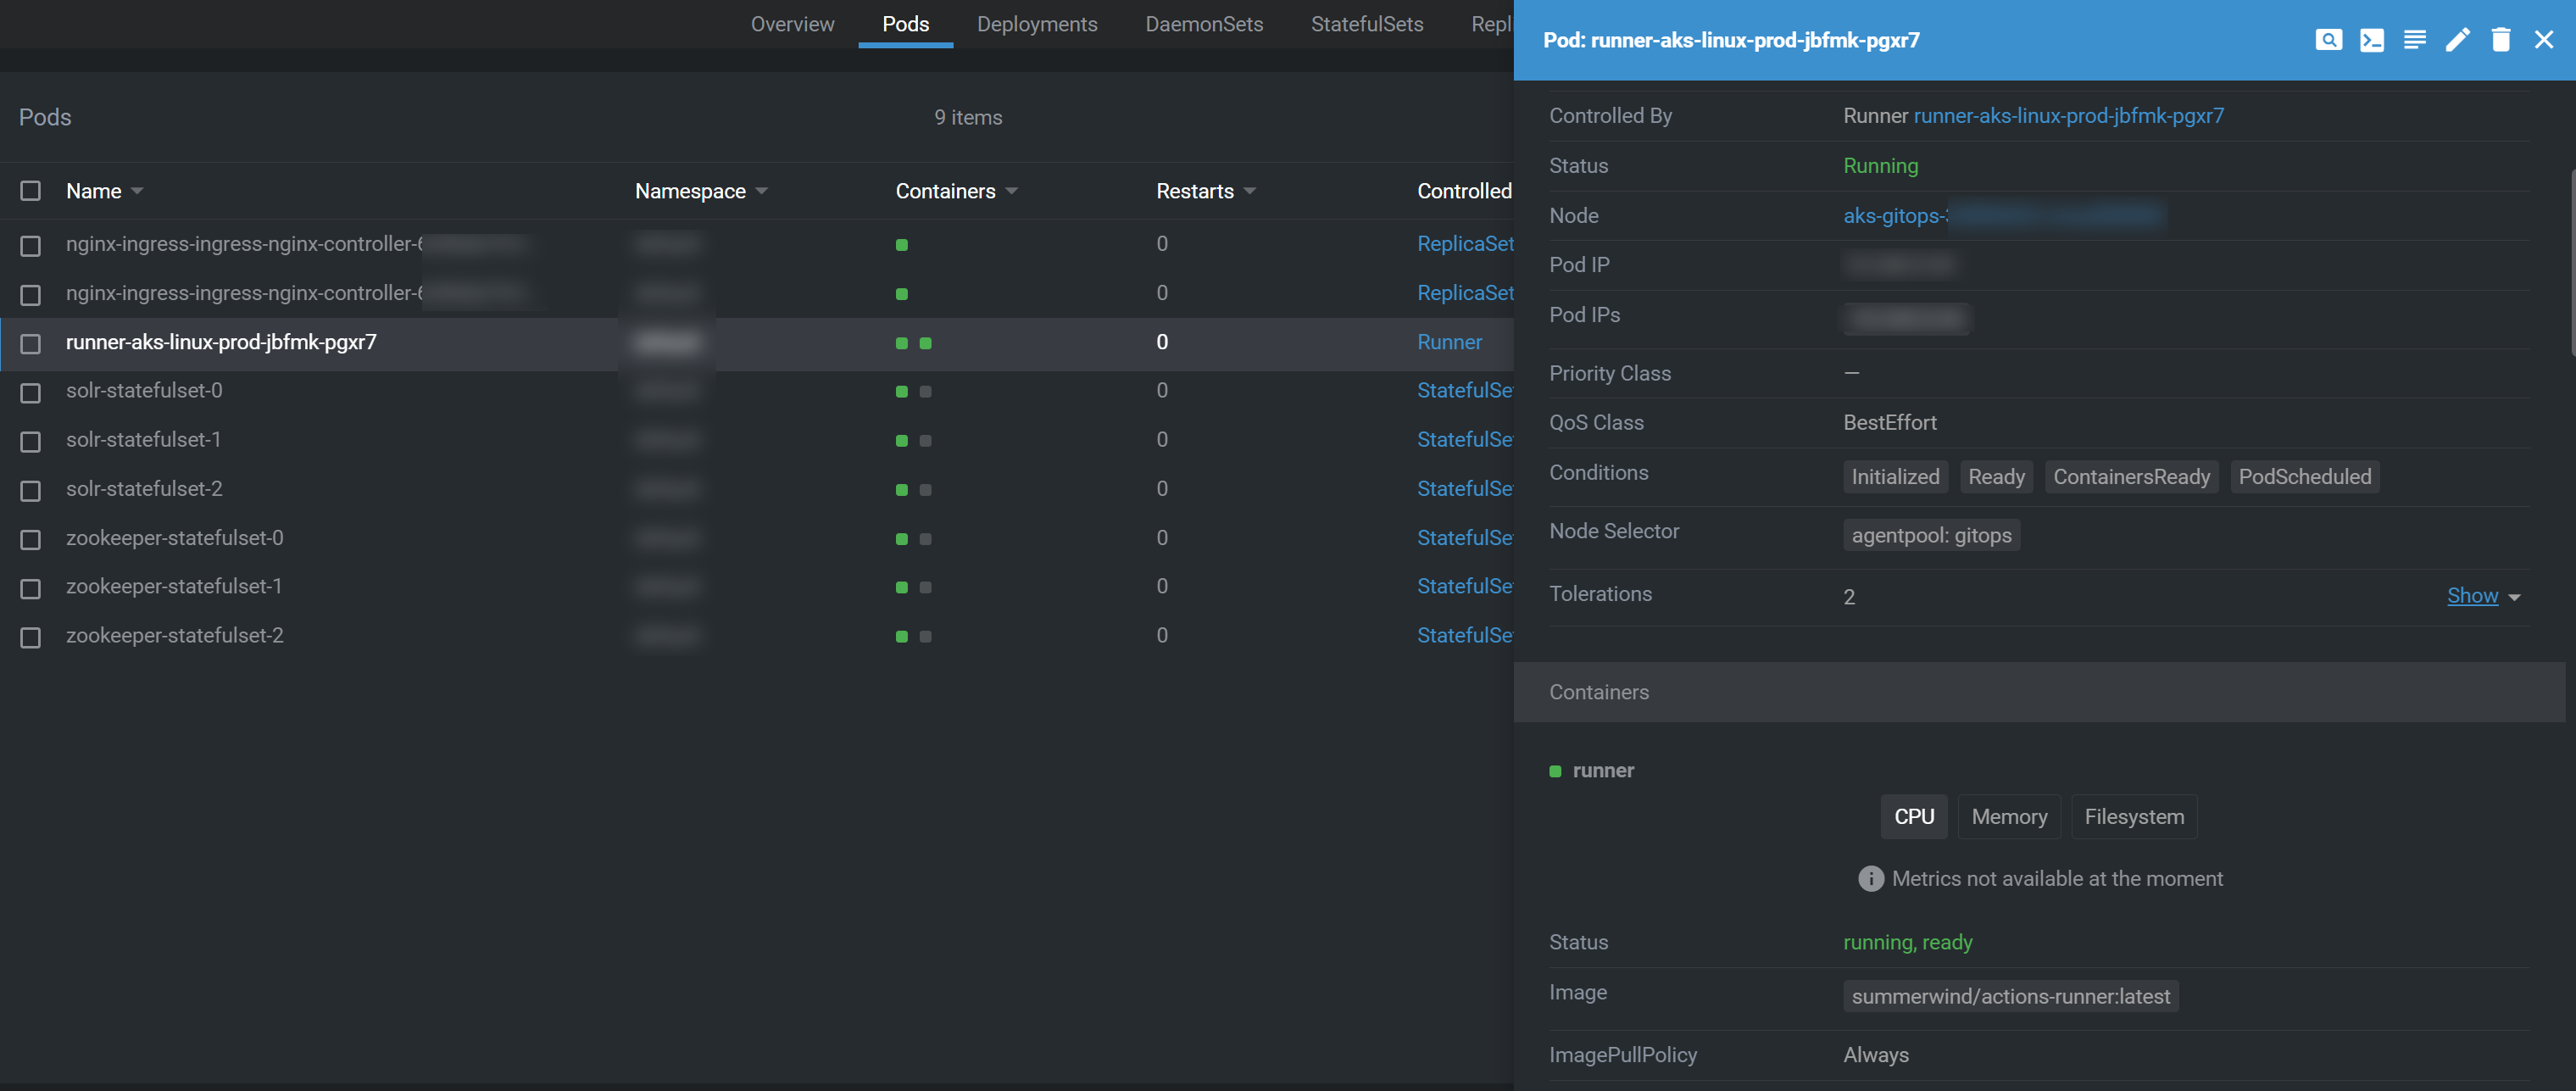
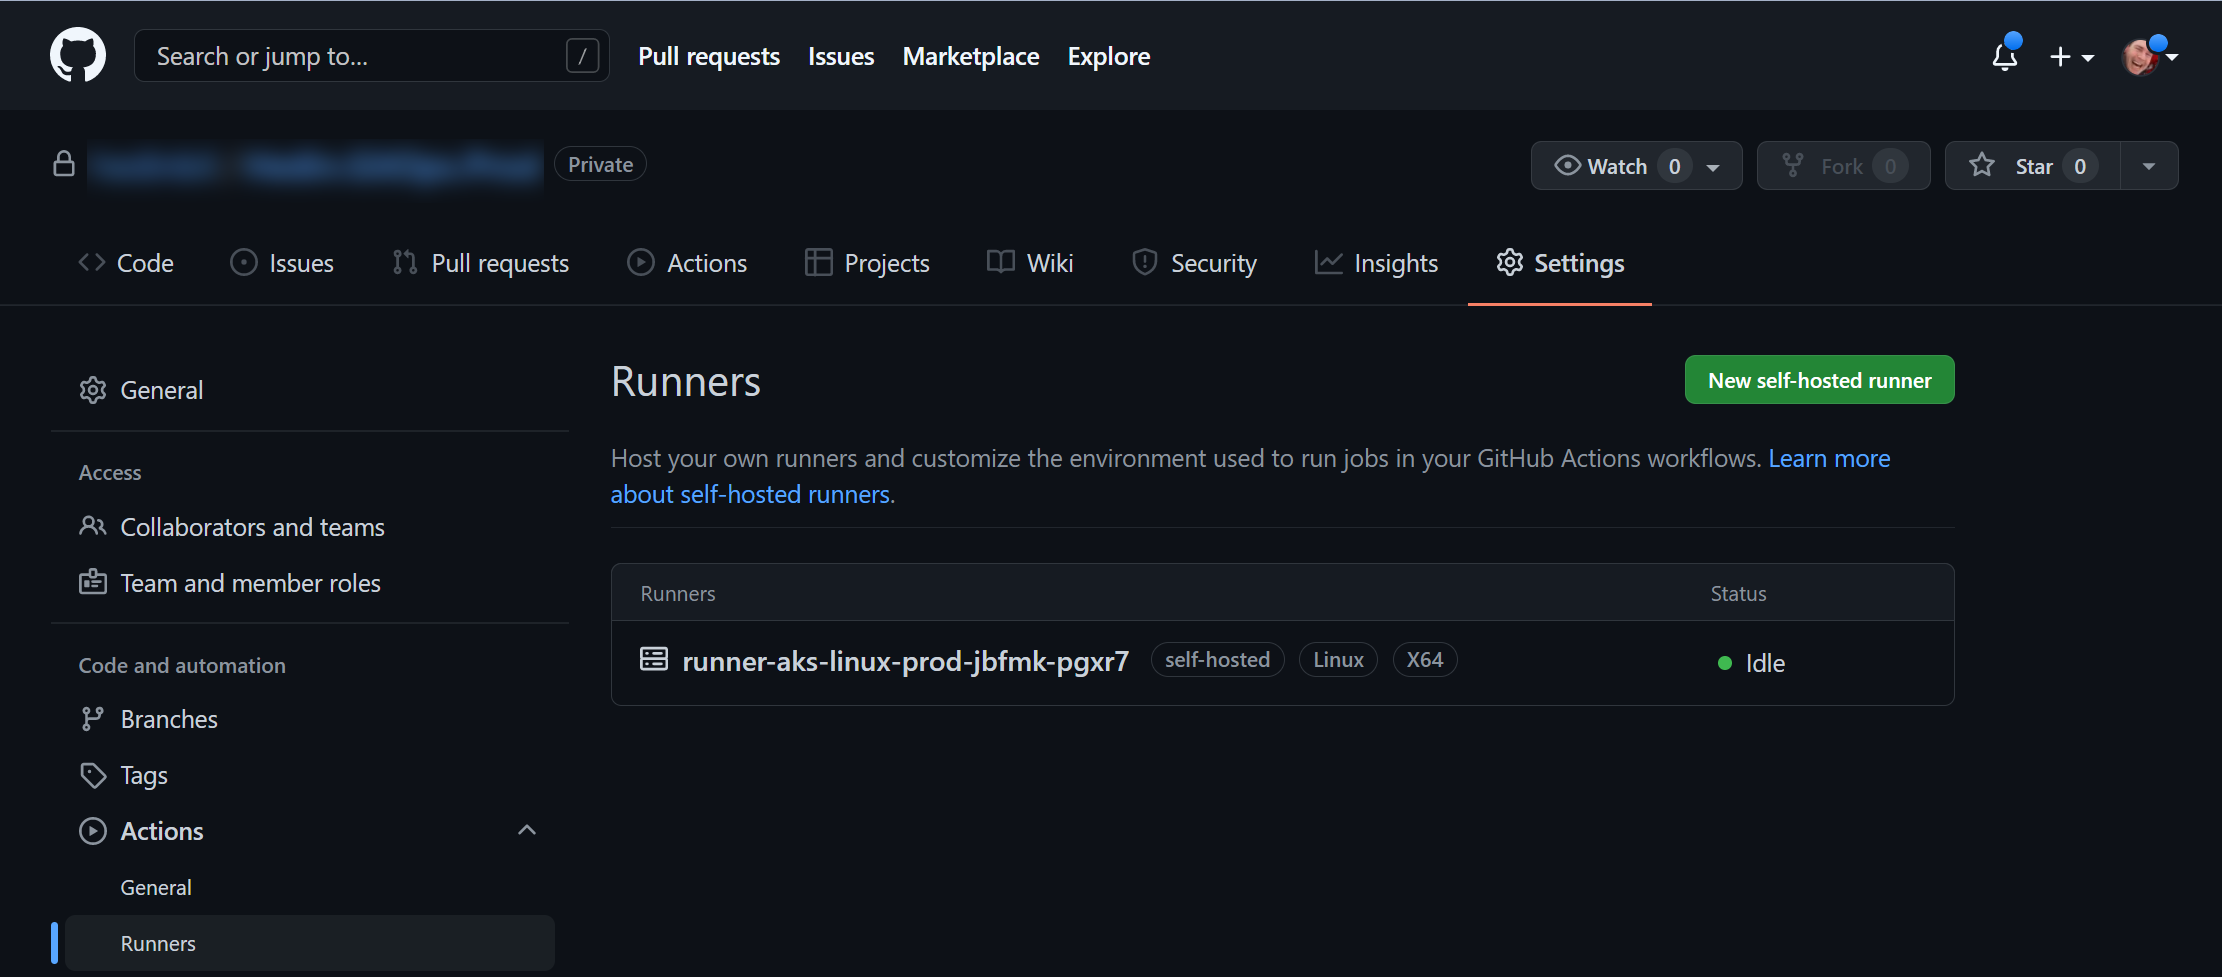
Looking good! And now to the moment of truth, will there be a runner in our github repo. To run or not tLooking good! And now, to the moment of truth, will there be a runner in our GitHub repo. To run or not to run, that is the question 🙂
SUCCESS! We have a running (road)runner 🙂

Now to the fun part, let’s create a workflow that will push serialized Sitecore items to our Sitecore instance running on Kubernetes. And guess what we will be using… SITECORE CLI
Justin Vogt (product manager at Sitecore working on the Developer Experience team) and his merry team have done some amazing stuff. You should read his articles regarding Sitecore CLI:
Sitecore CLI version 4.0.0 now available!
Sitecore CLI 4.1 release is available!
So time to setup a workflow, here it is:
name: Push serialized sitecore items to kubernetes - Linux

on:
   workflow_dispatch:

jobs:
  push-content:
      name: Push sitecore items
      runs-on: [self-hosted, Linux]

      steps:
      - name: Checkout My very cool repo
        uses: actions/checkout@v3
        with:
          repository: myorganization/myverycoolrepo
          token: ${{ secrets.REPO_PAT }}
          ref: main

      - name: Install dot net
        shell: bash
        run: |
          wget https://packages.microsoft.com/config/ubuntu/21.04/packages-microsoft-prod.deb -O packages-microsoft-prod.deb
          sudo dpkg -i packages-microsoft-prod.deb
          rm packages-microsoft-prod.deb

          sudo apt-get update; \
          sudo apt-get install -y apt-transport-https && \
          sudo apt-get update && \
          sudo apt-get install -y dotnet-sdk-3.1


      - name: Install sitecore cli
        shell: bash
        run: |
          dotnet nuget add source https://sitecore.myget.org/F/sc-packages/api/v3/index.json --name "Sitecore-Public-Nuget-Feed"
          dotnet tool restore

      - name: Login to sitecore
        shell: bash
        run: |
          dotnet sitecore login --client-credentials true --auth http://id --cm http://cm --allow-write true --client-id "Automation ID" --client-secret "schhh_secrets_and_even_more secrets" --insecure

      - name: Push sitecore items
        shell: bash
        working-directory: ${{ github.workspace }}
        run: |
          dotnet sitecore ser push --force -i ModuleNamespaceA.YYYY ModuleNamespaceB.XXXX Feature.* Foundation.*
Let me quickly “run” through the workflow.
First, we will check out our “Sitecore” repo, which will have the serialized items and module json files. The repo has already installed Sitecore Cli, meaning there will be a .sitecore folder containing installed(cached) nuget packages

Next is to install .ASP.Net Core 3.1. Yes, good people, Sitecore CLI is running on ASP.Net Core, meaning we can run Sitecore CLI on Linux(or mac if you want). Now that is indeed wonderful news 🙂
We will continue by installing Sitecore CLI on the (Linux) runner. We will do this with – dotnet tool restore.
And now to the pièce de résistance, we will log in to our Sitecore instance(running in kubernetes) by just using the “pod” names. HOW COOL IS THAT! That is the beauty of running workflows within kubernetes and as I mentioned before, the runner is using the same namespace as CM and ID 🙂
      - name: Login to sitecore
        shell: bash
        run: |
          dotnet sitecore login --client-credentials true --auth http://id --cm http://cm --allow-write true --client-id "Automation ID" --client-secret "schhh_secrets_and_even_more secrets" --insecure
Thanks to the great work from Sitecore team 🙂
Login command support for unsecure connections to authority endpoints
Last part will do the actual pushing:
      - name: Push sitecore items
        shell: bash
        working-directory: ${{ github.workspace }}
        run: |
          dotnet sitecore ser push --force -i ModuleNamespaceA.YYYY ModuleNamespaceB.XXXX Feature.* Foundation.*
I hope you guys see the potential of using self-hosted workflows within a kubernetes cluster. For example, we can rebuild solr indexes using Sitecore CLI. But also do rest API calls to Sitecore Commerce, like bootstrap or run minions for rebuilding catalogs, pricing, promotions, etc. And best of all, it’s all secure, because we are running within the cluster!
That’s all for now folks 😊

3 thoughts on “Run Sitecore CLI within your Kubernetes cluster using self-hosted GitHub actions”