
Sitecore Content Hub, Sitecore Content Hub, Sitecore Content Hub …
Interesting times indeed!
My journey has just begun when it comes to Sitecore Content Hub. During the journey, I will try to share my findings as much as possible.
So what is Sitecore Content Hub?
Well, this page explains it very well – What is a content hub?
A content hub acts as home base for all your disparate content, as well as a platform that helps streamline, speed up, and simplify every part of a marketer’s job — all in one solution. It offers a clear view and intuitive, collaborative features that keep the complexity low and the added value high.
What’s very cool is that Sitecore Content Hub is a cloud-only service, a Saas service. Love it!
Right now the Sitecore Content Hub covers the following areas:
Digital Asset Management (DAM)
Content Marketing Platform (CMP)
Marketing Resource Management (MRM)
Product Content Management (PCM)
The documentation is OUTSTANDING, check it out at https://docs-partners.stylelabs.com/index.html
Today’s post will be about the Content Marketing Platform (CMP) and how to connect to it.
A Content Marketing Platform allows the planning, authoring, collaboration, curation and distribution of the different content types that drive the execution of a content marketing strategy while allowing campaign management. CMP is a central hub providing an overall view of all content and how it is performing. It is an essential platform to help with planning and analyzing content marketing campaigns and individual pieces of content.
The purpose of CMP is to attract and retain customers by consistently creating relevant and valuable content. Content Marketing is an ongoing process of content creation and adaptation that is integrated into an overall marketing strategy with drill-down visibility. CMP integrates editing, collaboration, and approval tools.
CMP offers an out-of-the-box comprehensive data modeler to create, manage and deliver valuable digital content such as blog posts, white papers, emails, social media posts, recipes, etc.
The digital content created in CMP is curated, easily adaptable, and can be simply localized for target markets. The automatic version control tracks every previous version of content and every associated revision included in a comment train.
In order to connect to the Content Marketing Platform (CMP) we will need some kind of connector – Sitecore Connect for Sitecore CMP
The Sitecore Content Management Platform (CMP) connector lets you synchronize content created in Sitecore Content Hub to Sitecore Experience Platform (XP).
With the module, you can:
• Map Sitecore Content Hub fields to Sitecore fields.
• Create a language version based on the relationship in the Sitecore Content Hub.
• Update items automatically.
• Set the publication date.
• Create content items in buckets.
So now you know what Sitecore Connect for Sitecore CMP is, let’s set it up 🙂
But before we start, you will need to have a Sitecore Content Hub application/website/portal running. I recommend you contact your Sitecore partner or go directly to Sitecore.
You will, of course, need a Sitecore instance(In this case it will be Sitecore 9.2).
We will download the Sitecore Connect™ CMP for Sitecore XP 9.2 package, navigate to https://dev.sitecore.net/Downloads/Sitecore_Connect_for_Sitecore_CMP/10/Sitecore_Connect_for_Sitecore_CMP_100 and locate the package.
Don’t forget to download the instructions:
Installation and Configuration Guide – Next is to follow the instructions in the Sitecore-Connect-for-Sitecore-CMP-1.0-installation-and-configuration-manual.pdf
Sitecore Connect™ CMP Guide – Sitecore-Connect-for-Sitecore-CMP-guide.pdf
We will follow the instructions in the Sitecore-Connect-for-Sitecore-CMP-1.0-installation-and-configuration-manual.pdf.
1. Install the package in our Sitecore instance.
That was easy 🙂
2. Configure Azure Service Bus
Now that was all new to me, so what does the Azure Service Bus do?
Azure Service Bus is a messaging service hosted on the Azure platform that enables exchanging messages between various applications. The Azure Service Bus receives messages from Sitecore Content Hub when content is created, and messages from Sitecore Connect™ for Sitecore CMP when content is created or updated.

Sign in to the Azure portal, select “Create a resource” and search for Service Bus.
In the Create namespace dialog, it’s important that you choose at least the “Standard” price tier. Otherwise, you will not have access to Topics.

So what are Topics?
All data communicated through the Service Bus brokered messaging services is encapsulated in messages, there are two message models – Queues and Topics.
Service bus Queues provide a FIFO queuing model similar to MSMQ and the queues in Windows Azure storage services.
Topics(and subscriptions) provide a publish/subscribe model for exchanging messages between applications
We now have a Service Bus, next is to create two Topics.
m_out
m_in
In the m_out(Topic) we will also create a subscription with the name sitecore.
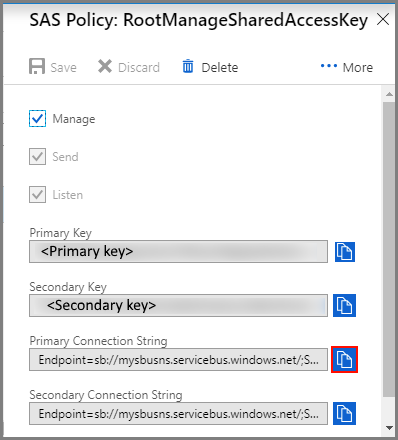
That’s it, now we just need the “connection string” to the Azure Service Bus. Go to Shared access policies and select RootManageSharedAccessKey, here you should see the Primary Connection String. Copy it somewhere, we will use it later 🙂
3. Configure the Sitecore Content Hub – Create a user, an action and a trigger.
☑ 1.Creating the user(Super-user) is pretty straight forward, easy peasy 😉
☑ 2.Creating an Action that will connect to the Azure Service Bus and post a message when a certain trigger is fired. We will set the connection string and the topic “m_out”.
Wait a minute! What is an Action?
In Sitecore Content Hub, Actions are components that perform a specific task. These actions can either be manually triggered by a user via the User Interface, or automatically run by a trigger or via the APIs.
Currently, Sitecore Content Hub supports the following Actions:Action scripts API call Azure event hub Azure service bus Reporting channel M Azure service bus Start state machine Print entity generation
☑ 3.Creating a Trigger that will trigger the content import when an item (in the Content Marketing Platform) is moved to the Publish workflow state.
Hold on, what is a Trigger?
Sitecore Content Hub provides users with a Trigger framework, which allows them to configure triggers via the User Interface (UI). A trigger is a set of actions that are automatically executed after specific events and under specific conditions.
A trigger consists of 3 components :
Event : The event to which the trigger should react. Conditions : The conditions under which the trigger’s actions are executed. Actions : The actions that the trigger executes.
4. Configure the Sitecore Content Hub credentials in our Sitecore instance
Straight forward here, just enter the fields in /sitecore/system/Modules/CMP/Config:
☑ 1.Get and set Client id and Client Secret.
☑ 2.Set User Name and Password.
☑ 3.Set your Content Hub URI.
Next up is the Azure Service Bus settings.
☑ 4.Connection String to the Azure Service Bus
☑ 5.Incoming topic name – m_out (The topic of the messages posted by the Sitecore Content Hub, posted after the trigger is fired)
☑ 6.Incoming subscription name – sitecore
☑ 7.Outgoing topic name – m_in (The topic of the messages posted to the Azure Service Bus after content is imported to Sitecore)
Then restart the Sitecore website.
About the default language, I recommend you use/select “en”.
*not “en-US”
4. Configure content and field mappings
First up is to create a Bucket. The bucket will receive(and store) CMP(Sitecore Content Management Platform) content from the Sitecore content hub (Thanks to the Azure Service Bus).
A good idea is to create a Bucket per Content Type.
So what is a typical content from CMP? Well, a content could be one of out-of-the-box content types:
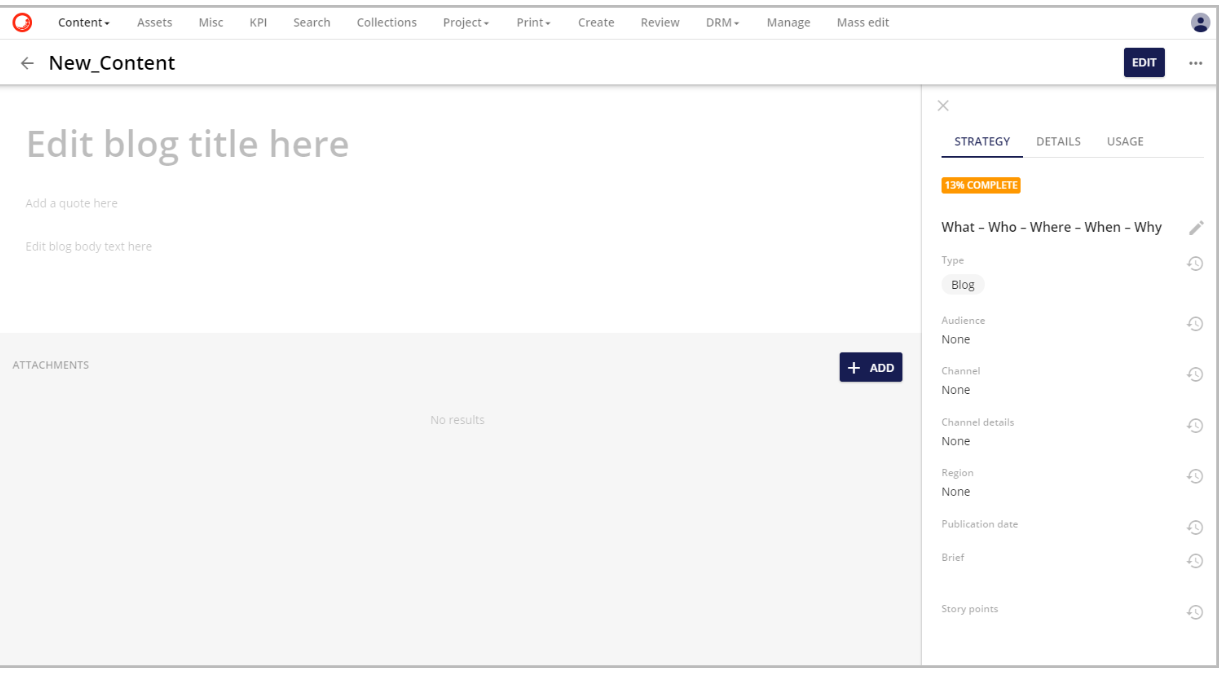
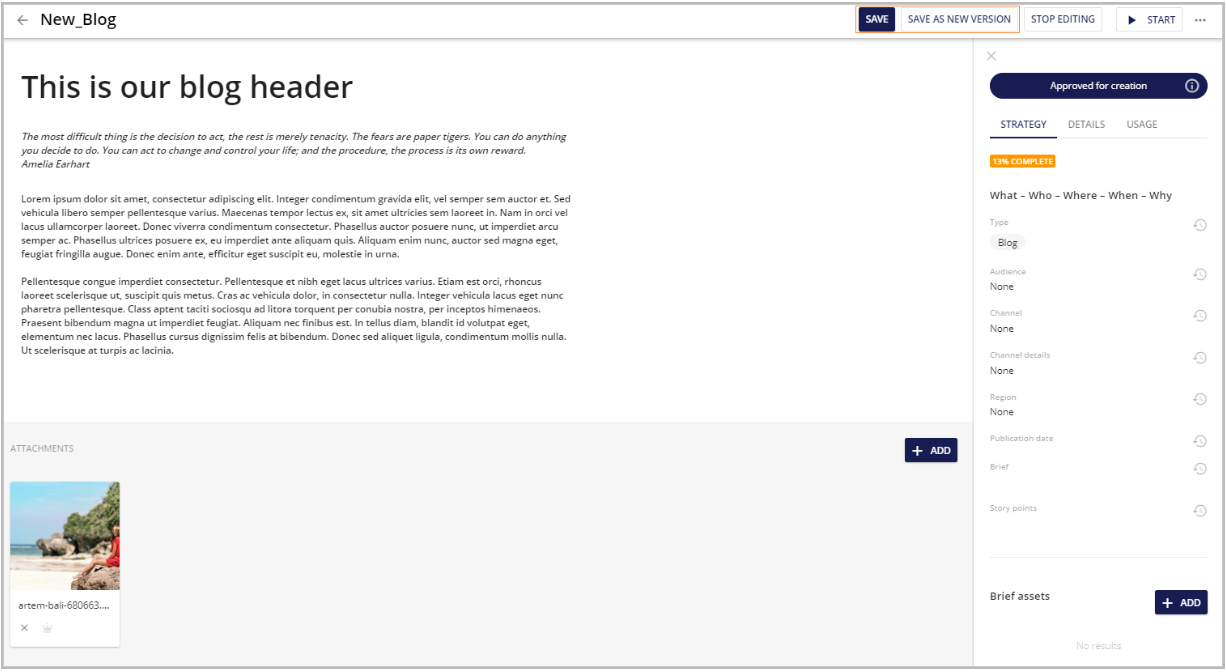
Here is how a Blog content could look like in the Sitecore Content Hub:
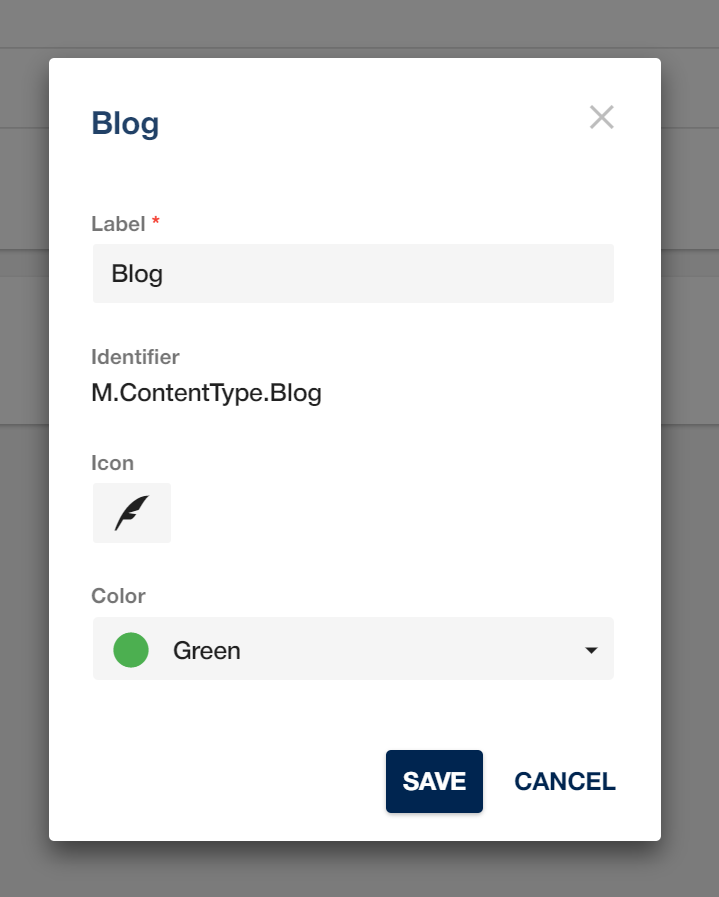
You can also create your own Content Type:

*The downside is that the content type only supports the following field(member) types: Single Line, Multiple Lines and HTML.

I have a feeling there will be more fields(members) soon 🙂
We will continue following the instructions and create a Bucket, by right-clicking the CMP folder(sitecore/content/CMP).
*We got the folder from the Sitecore Connect for Sitecore CMP package.
Match and map the content from CMP to the Sitecore items, we will do this by using the defined “CMP” templates. It’s important to inherit from the Content Hub Entity template, the template contains the EntityIdentifier field.
Content Hub Entity – each content item template created for the connector, must inherit from this template. It mixes in the EntityIdentifier field and in this way the connector can match entities to Sitecore items.
We will create a Blog template that will inherit the Content Hub Entity template.
And some fields:
Title – Single-Line
Body – Rich Text
Next is the Entity Mapping, which defines how content(CMP) is imported and in what bucket the content is stored.
Entity Mapping – to be able to sync entities of a given content type.
We will follow the instructions… Go to /sitecore/system/Modules/CMP/Config and add an Entity Mapping item for the Blog and fill out the fields.

- Field “Content Type Id”, here we set the ContentType identifier from CMP.

-
Field “Bucket”, here we select our newly created “Blogs” bucket.
- Field “Template”, let’s point out our newly created “Blog” template
Almost done, time for some Field mapping, map the “Blog(from CMP)” fields to the Blog item fields(in Sitecore)

To verify the entity type and structure in the Content Hub:
Create a new item in the Content Hub or edit an existing one, for example, a blog post.
Copy the URL, for example, https://yourdomain/en-us/content/detail/9782 and paste it in a new browser tab.
Change the URL to https://yourdomain/api/entities/9782 and press enter. The entity structure is now shown in JSON.
To find the entity’s content type, find the ContentTypeToContent relation and
follow the link https://yourdomain/api/entities/9782.
Here is an example of a very slim JSON, notice the field names for the Blog.
{
	"id": 000000,
	"identifier": "zxzxzxzx",
	"cultures": [
		"en"
	],
	"properties": {
		"Content.Name": "My Blogpost",
		"MasterAssetIsContent": null,
		"Content.ExpirationDate": null,
		"Content.PublishedOn": null,
		"Content.DynamicPublishDate": null,
		"Content.DaysFromCampaignStart": null,
		"Content.EngagementValue": null,
		"Content.PublicationDate": "2019-11-25T19:30:21+01:00",
		"Content.Brief": null,
		....
		....
		"Blog_Title": "Winter is coming",
		"Blog_Quote": null,
		"Blog_Body": "<h2>Blast through hard-packed snow</h2>...",
		....
		....
	}
	....
	....

}
Now we are finally done! If we now create content in Sitecore Content Hub, it will be automatically imported into the “Blogs” bucket in Sitecore.
I had some issues with the parsing of fields, I repeatedly got this error:
720 23:05:44 ERROR Sitecore Connect for Sitecore CMP: Specified cast is not valid.
Exception: System.InvalidCastException
Message: Specified cast is not valid.
Source: Stylelabs.M.Sdk
   at Stylelabs.M.Sdk.Models.Base.EntityBase.GetPropertyValue[T](String name)
   at Sitecore.Connector.CMP.Pipelines.ImportEntity.SaveFieldValues.Process(ImportEntityPipelineArgs args, BaseLog logger)
   at Sitecore.Connector.CMP.Pipelines.ImportEntity.ImportEntityProcessor.Process(ImportEntityPipelineArgs args)
 720 23:05:44 INFO  Sitecore Connect for Sitecore CMP: Sending a message: {
  "input_message_id": "8f365c5b4f134f86bd229e8a7f7d1b9f",
  "item_id": "{4DA26968-E700-4497-82B2-82F769BB6FCD}",
  "target_id": xxxx,
  "target_identifier": "xxxzzzzyyyy",
  "exception_message": "Specified cast is not valid.",
  "exception_type": "System.InvalidCastException"
}
*It never mapped the fields, it just created an empty item in the bucket.
Then suddenly it worked, I had no idea why… 🤔
But thanks to Mikael Högberg, who writes some very nice blog posts at – https://mikael.com/
CMP won’t import content to the item fields if “Content.PublicationDate” or “Content.ExpirationDate” is set, because SaveFieldValues.Process() tries to cast those to DateTime? (nullable datetime) but the type embedded in the entity is DateTimeOffset?
That’s all for now folks 🙂
