
Dear friends,
There are indeed exciting times ahead for Sitecore, I’m thinking of Sitecore SaaS. Where Sitecore will become a typical “black box” (in the cloud). Love it! What really warms my heart is that .Net Core is coming 🙂
Here is a great post by Jeremy Davies, where he describes Sitecore SaaS very well – WHITHER PAAS?
Other great(and wonderful) news is the Sitecore Helix Examples Repository (at Github). Nick Wesselman(at Sitecore) has been really busy and has done an outstanding job. Thank you Nick for this!
That’s what today’s post will be about, the wonderful Sitecore Helix Examples Repository with a twist 😉
So what is Sitecore Helix Examples Repository? Well it’s a bunch of samples on how to use the Sitecore Helix pattern.
The Sitecore Helix Examples are demonstrations of Sitecore Helix practices across various tooling and business scenarios. They are intended to demonstrate a wider variety of implementation types / requirements than existing examples.
What I really love about the Sitecore Helix Examples Repository is that it covers both Sitecore Unicorn and Sitecore TDS.
Today there are three sample projects:
helix-basic-tds-consolidated
helix-basic-tds
helix-basic-unicorn
I would like to introduce a fourth sample project – helix-basic-tds-with-docker-vs2019-project-type!
It will use Sitecore Docker Images and the new project type, Microsoft.NET.Sdk.
Css and Javascript will be divided into modules and placed into “correct” layers(foundation, feature or project). The CSS “modules” will be in scss. Libman will help us to download our favourite CSS framework – no need for Node 😉 Sitecore TDS will handle serialization and syncing of the Sitecore items. I really like that TDS is now supporting Rainbow Yaml Serialization, very nice indeed!
All together in harmony 🙂
The solution helix-basic-tds-with-docker-vs2019-project-type is a fork from the Sitecore Helix Examples Repository.
Let’s dive into the solution 🙂
First up is the Docker part. Instead of installing Sitecore and all that, we will go for https://github.com/Sitecore/docker-images. For not so long ago I did a blog post about it – Dockers Dockers Dockers with Sitecore for developers. Some things have changed since I wrote the blog post. Let me quickly go through how it works in this solution:
We need to generate Sitecore Images, so copy or fork repository – https://github.com/Sitecore/docker-images.
Follow the instructions and run the build.ps1, here is my version of the Build.ps1
[CmdletBinding(SupportsShouldProcess = $true)]
[System.Diagnostics.CodeAnalysis.SuppressMessageAttribute("PSAvoidUsingPlainTextForPassword", "SitecorePassword")]
param(
    [Parameter(Mandatory = $false)]
    [ValidateNotNullOrEmpty()]
    [string]$InstallSourcePath = (Join-Path $PSScriptRoot "\packages")
    ,
    [Parameter(Mandatory = $true)]
    [ValidateNotNullOrEmpty()]
    [string]$SitecoreUsername
    ,
    [Parameter(Mandatory = $true)]
    [ValidateNotNullOrEmpty()]
    [string]$SitecorePassword
)

$ErrorActionPreference = "STOP"
$ProgressPreference = "SilentlyContinue"


$azureRepository = "sitecoreimages.azurecr.io"
$azureUserName = "ZZZZZZZZZ"
$azurePassword = "XXXXXXXXX"

# Login
docker login $azureRepository -u $azureUserName -p $azurePassword


# load module
Import-Module (Join-Path $PSScriptRoot "\modules\SitecoreImageBuilder") -Force

$baseTags = "*:9.2.0*1903"

# restore any missing packages
SitecoreImageBuilder\Invoke-PackageRestore `
    -Path (Join-Path $PSScriptRoot "\windows") `
    -Destination $InstallSourcePath `
    -SitecoreUsername $SitecoreUsername `
    -SitecorePassword $SitecorePassword `
    -Tags $baseTags `
    -WhatIf:$WhatIfPreference

# start the build
SitecoreImageBuilder\Invoke-Build `
    -Path (Join-Path $PSScriptRoot "\windows") `
    -InstallSourcePath $InstallSourcePath `
    -Registry $azureRepository `
    -Tags $baseTags `
    -PushMode "WhenChanged" # optional (default "WhenChanged"), can also be "Never" or "Always".
    -WhatIf:$WhatIfPreference
*If you don’t want to push the images to a registry, just change the pushmode to Never. Don’t forget to comment out the login part to the registry. But please keep the azureRepository, we need it for tagging the docker images.
I wanted to make it easy(creating docker containers) for you guys – it’s all ready for you to make some magic 🙂
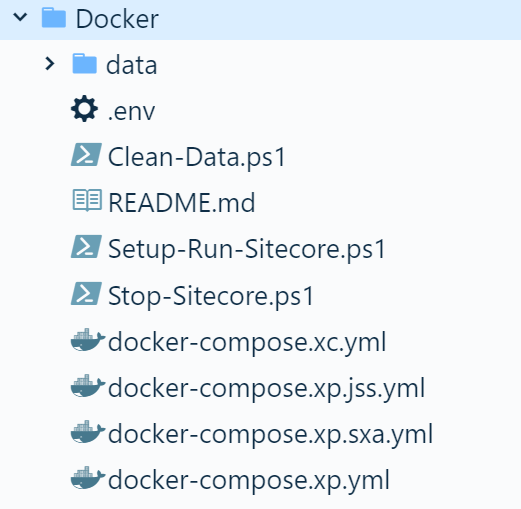
Follow the instructions in the readme to create the docker containers.
Instead of ”black-boxing” the Sitecore instances, the wwwroot folders(from the docker instances “CM” and “CD”) will be copied to the data folder.
*This is also where we will deploy/publish(from the solution) our dll’s, configs, views, js, and css.
So now we should have a clean Sitecore 9.2 at http://basic-company 🙂
Let’s continue with the building of the solution
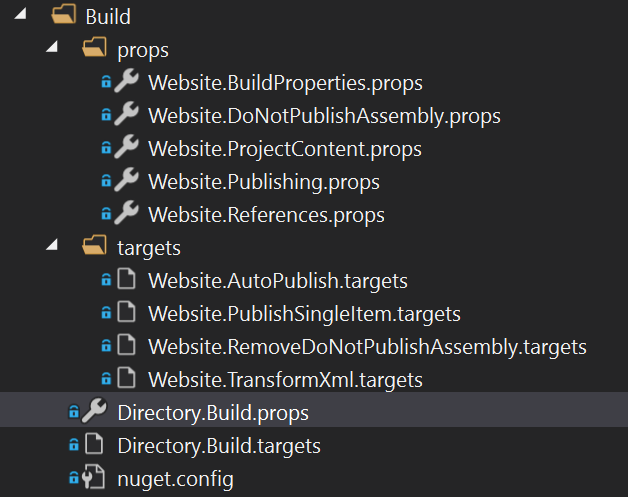
We are using the new project type(it’s so much cleaner), thanks again Anders Laub for the Sitecore Helix Visual Studio Templates extension.
*I had to make some smaller fixes/changes to make the test project’s work properly.
In the Build folder, you will find all the juicy MSBuild stuff. Doing its building and publishing 😉
Up next is the JavaScript
We will divide/split the javascript into modules and put them in the “right” layer and project:
Feature/BasicContent/website/js/accordion.js

Feature/Navigation/website/js/navigation.js
For bundling and minifying js files, we will use Mads Kristensen’s package – BuildBundlerMinifier
It will be referenced in the BasicCompany.Project.BasicCompany project and the bundleconfig.json will do the magic:
[
  {
    "outputFileName": "js/basic-company.js",
    "inputFiles": [
      "../../../Feature/Navigation/website/js/navigation.js",
      "../../../Feature/BasicContent/website/js/accordion.js"
    ]
  }
]
Moving on to CSS
We will also divide/split the css into modules and put them in the “right” layer and project:
Feature/BasicContent/website/css/title.scss

Feature/BasicContent/website/css/hero.scss

Feature/BasicContent/website/css/card.scss

Feature/BasicContent/website/css/promocard.scss

Feature/BasicContent/website/css/accordion.scss

Feature/Navigation/website/css/footer.scss

Feature/Navigation/website/css/navbar.scss

Feature/Products/website/css/productlist.scss

Feature/Products/website/css/productdetail.scss

Feature/Services/website/css/services.scss
Instead of using Node for downloading the Bulma CSS framework, we will use Libman. I put it in a separate project – Foundation.CssVendors which references the Microsoft.Web.LibraryManager.Build package.
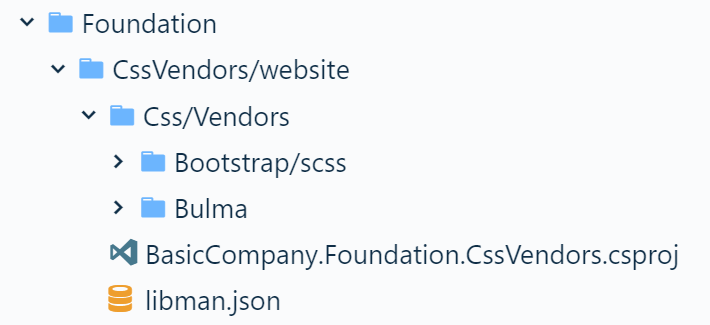
All the magic for downloading the CSS stuff happens in the libman.json:
{
      "library": "bulma-scss@0.8.0",
      "destination": "Css/Vendors/Bulma",
      "files": []
}
And in BasicCompany.Project.BasicCompany project we will have the basic-company.scss:
@charset "utf-8";

// Import the initial variables
@import "../../../Foundation/CssVendors/website/Css/Vendors/Bulma/utilities/_initial-variables";

// Global Overrides
$family-sans-serif: 'Montserrat', sans-serif;
$red: #FF4036;
$blue: #155786;
$primary: #155786;
$primary-invert: #fff;

// Title Overrides
$title-size: 33px;
$title-color: #2B2B2B;
$title-line-height: 40px;

// Navbar Overrides
$navbar-item-img-max-height: 45px;
$navbar-tab-active-border-bottom-color: $red;
$navbar-tab-hover-border-bottom-color: $black;

// Footer Overrides
$footer-background-color: $black;

// Import the rest of Bulma
@import "../../../Foundation/CssVendors/website/Css/Vendors/Bulma/bulma";

@import "../../../Feature/BasicContent/website/css/title.scss";
@import "../../../Feature/BasicContent/website/css/hero.scss";
@import "../../../Feature/BasicContent/website/css/card.scss";
@import "../../../Feature/BasicContent/website/css/promocard.scss";
@import "../../../Feature/BasicContent/website/css/accordion.scss";
@import "../../../Feature/Navigation/website/css/footer.scss";
@import "../../../Feature/Navigation/website/css/navbar.scss";
@import "../../../Feature/Products/website/css/productlist.scss";
@import "../../../Feature/Products/website/css/productdetail.scss";
@import "../../../Feature/Services/website/css/services.scss";

// for pages without a hero on top
.navbar + .container {
  margin-top: 50px;
}
For compiling the scss file to css we will use/reference another nice package from Mads Kristensen – BuildWebCompiler.
The compilerconfig.json will help us with the compiling
[
  {
    "inputFile": "css/basic-company.scss",
    "outputFile": "css/basic-company.css"
  }
]
Last is the serialization and syncing of the Sitecore items
Sitecore TDS will handle serialization and syncing of the Sitecore items. I really like that it’s supporting Rainbow Yaml Serialization. Very nice indeed! So lets use the Rainbow Yaml stuff 🙂 e need to make a change in Sitecore to support the Yaml serialization, default it’s using the “old” serialization. I’ve created a separate project for that, called BasicCompany.Environment.Configuration
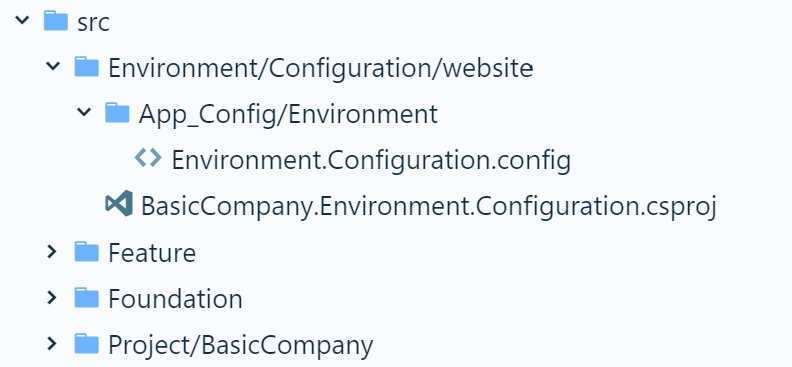
Here is the config patch Environment.Configuration.config:
<?xml version="1.0" encoding="utf-8" ?>
<configuration xmlns:patch="http://www.sitecore.net/xmlconfig/" xmlns:set="http://www.sitecore.net/xmlconfig/set/"
               xmlns:role="http://www.sitecore.net/xmlconfig/role/" xmlns:env="http://www.sitecore.net/xmlconfig/env/">
  <sitecore>
    <settings>
      <setting name="Serialization.SerializationType" >
        <patch:attribute name="value" value="YAML" />
      </setting>
    </settings>
  </sitecore>
</configuration>
That’s it! Go ahead and try it out and let me know what you think. If you have any issues, just ping me and I will try to help/guide you.
That’s all for now folks 🙂
