Dear fellow Sitecore developers, I hope you are well out there 🙂 What a month November was/is! Sitecore released 10.2 and Microsoft released .Net 6 and VisualStudio 2022 – Pure joy for all .Net developers!
What I really like about the Sitecore 10.2 release is that Horizon now supports Sitecore JSS or as it is called now – Sitecore Headless and Sitecore CLI now supports Role serialization. There are some really good blog posts describing all the new cool features in Sitecore 10.2, have a look at Martin Miles blog post – 10+2 features of Sitecore 10.2 you must be aware of
Today’s post will be about setting up SorlCloud in Kubernetes. There are some great blog posts about SorlCloud and the ones that inspired me were:
George Chang – Sitecore Deployment on Kubernetes Example
Jeremy Davies – An example of a SolrCloud Docker container for Sitecore v10
So the idea is this. We will use Jeremy’s great scripts when creating the Linux SorlCloud image and use George’s lovely K8 specs for setting up SorlCloud in Kubernetes.
We could go for George’s solution and we probably should. But I wanted to try out to run PowerShell in a Linux image, that is why we are using Jeremy’s Powershell scripts for generating collections and configurations.
Let’s start with the docker setup and the creation of SolrCloud images.
In my docker/build folder I have the SolrCloud folder. It’s more or less a copy of Jeremy’s GitHub project, https://github.com/jermdavis/Sitecore-SolrCloud-Docker. Besides the Linux docker file and the commerce collections and configurations.
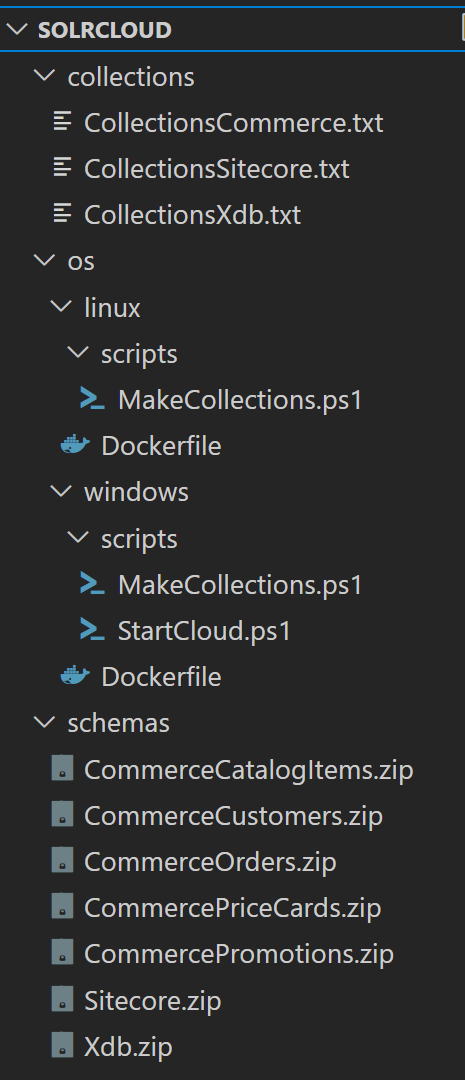
In MakeCollection.ps1 I just added the commerce collections and configurations in method Configure-SolrCollection:
function Configure-SolrCollection
{
	param(
		[string]$targetFolder,
		[string]$solrHostname = "solr",
		[int]$solrClientPort = 9999,

		[int]$shards = 1,
        [int]$replicas = 1,
        [int]$shardsPerNode = 1,

        [string]$collectionsSitecore,
        [string]$collectionsXdb,
        [string]$collectionsCommerce
	)

    $coreConfigFolder = $targetFolder

	$sitecoreCores = Get-Content $collectionsSitecore
    $xdbCores = Get-Content $collectionsXdb
    $commerceCores = Get-Content $collectionsCommerce

	Upload-SolrConfigSet $solrHostname $solrClientPort "$coreConfigFolder\Sitecore.zip" "Sitecore"
	Upload-SolrConfigSet $solrHostname $solrClientPort "$coreConfigFolder\Xdb.zip" "Xdb"
	Upload-SolrConfigSet $solrHostname $solrClientPort "$coreConfigFolder\CommerceCatalogItems.zip" "CommerceCatalogItems"
    Upload-SolrConfigSet $solrHostname $solrClientPort "$coreConfigFolder\CommerceCustomers.zip" "CommerceCustomers"
    Upload-SolrConfigSet $solrHostname $solrClientPort "$coreConfigFolder\CommerceOrders.zip" "CommerceOrders"
    Upload-SolrConfigSet $solrHostname $solrClientPort "$coreConfigFolder\CommercePriceCards.zip" "CommercePriceCards"
    Upload-SolrConfigSet $solrHostname $solrClientPort "$coreConfigFolder\CommercePromotions.zip" "CommercePromotions"

    foreach($coreS in $sitecoreCores)
	{
		Create-SolrCollection $solrHostname $solrClientPort $coreS "Sitecore" -shards $shards -replicas $replicas -shardsPerNode $shardsPerNode
	}

	foreach($coreX in $xdbCores)
	{
		Create-SolrCollection $solrHostname $solrClientPort "$($coreX)_internal" "Xdb" -shards $shards -replicas $replicas -shardsPerNode $shardsPerNode
		Create-SolrCollectionAlias $solrHostname $solrClientPort "$($coreX)_internal" $coreX
	}

    foreach($coreC in $commerceCores | Where-Object { $_.Contains("CatalogItems") })
	{
		Create-SolrCollection $solrHostname $solrClientPort $coreC "CommerceCatalogItems" -shards $shards -replicas $replicas -shardsPerNode $shardsPerNode
	}

    foreach($coreC in $commerceCores | Where-Object { $_.Contains("Customers") })
	{
		Create-SolrCollection $solrHostname $solrClientPort $coreC "CommerceCustomers" -shards $shards -replicas $replicas -shardsPerNode $shardsPerNode
	}

    foreach($coreC in $commerceCores | Where-Object { $_.Contains("Orders") })
	{
		Create-SolrCollection $solrHostname $solrClientPort $coreC "CommerceOrders" -shards $shards -replicas $replicas -shardsPerNode $shardsPerNode
	}

    foreach($coreC in $commerceCores | Where-Object { $_.Contains("PriceCards") })
	{
		Create-SolrCollection $solrHostname $solrClientPort $coreC "CommercePriceCards" -shards $shards -replicas $replicas -shardsPerNode $shardsPerNode
	}

    foreach($coreC in $commerceCores | Where-Object { $_.Contains("Promotions") })
	{
		Create-SolrCollection $solrHostname $solrClientPort $coreC "CommercePromotions" -shards $shards -replicas $replicas -shardsPerNode $shardsPerNode
	}

}
Let’s have a look at the Linux docker file. Here we are installing Powershell in order to run Jeremey’s scripts.
ARG SOLR_VERSION=8.4
FROM solr:${SOLR_VERSION}

USER root

RUN apt-get update
RUN apt-get install -y curl gnupg apt-transport-https

RUN wget https://packages.microsoft.com/config/debian/10/packages-microsoft-prod.deb

# Register the Microsoft repository GPG keys
RUN dpkg -i packages-microsoft-prod.deb

# Update the list of products
RUN apt-get update

# Install PowerShell
RUN apt-get install -y powershell

WORKDIR /home/cloud

COPY ./os/linux/scripts/ .
COPY ./schemas/ .
COPY ./collections/ .

WORKDIR /opt/solr-8.4.0
Time to generate the Linux image, we could do it manually => switching docker to Linux and run the command:
docker build -t sandbox.azurecr.io/sandbox-linux-solr-8.4.0:manually -f os/linux/Dockerfile .
Or we could do it with Github Actions 🙂 Notice that we are pushing to two image repositories => Azure and GitHub Packages. This is not needed but you guys should really consider GitHub Packages, it’s the “new” thing 😉
name: Build and push solr image

on:
  # run it on push
  push:
    branches: [main]
  # run it manually if needed
  workflow_dispatch:

jobs:
  build-and-push-solr-image:
    name: Build solr image and push to repositories
    runs-on: ubuntu-latest

    steps:
      - name: Checkout code
        uses: actions/checkout@v2

      - name: Set up Docker Buildx
        id: buildx
        uses: docker/setup-buildx-action@v1

      - name: Login to ACR - Azure
        uses: docker/login-action@v1
        with:
          registry: sandbox.azurecr.io
          username: ${{ secrets.AZURE_CLIENT_ID }}
          password: ${{ secrets.AZURE_CLIENT_SECRET }}

      - name: Login to Github Packages
        uses: docker/login-action@v1
        with:
          registry: ghcr.io
          username: ${{ github.actor }}
          password: ${{ secrets.PAT }}

      - name: Build image and push to Azure and Github packages
        uses: docker/build-push-action@v2
        with:
          context: ./docker/build/solrcloud
          file: ./docker/build/solrcloud/os/linux/Dockerfile
          tags: |
            sandbox.azurecr.io/sandbox-linux-solr-8.4.0:stage
            ghcr.io/MyOrganisation/sandbox-linux-solr-8.4.0:stage
          # build on feature branches, push only on main branch
          push: ${{ github.ref == 'refs/heads/stage' }}

      - name: Image digest
        run: echo ${{ steps.docker_build.outputs.digest }}
Great, the solr image is created and pushed. Time for Kubernetes 😍
Before we continue, I would like to give a HUGE shout-out to George Chang and his work with the K8 specs for SolrCloud! Thank you for this!
George has already done the heavy lifting, meaning we will copy his excellent work. There are some minor changes: another version of zookeeper and we use Kustomization.

Here is a gist link for zookeeper and solr – Gist Away
It’s time to deploy to Kubernetes. But first, a shout-out to Rob Earlam and his merry team for building the Sitecore MVP at Github and setting up a proper deploy flow. You guys rock! Keep up the good work!
Let’s have a look at the Azure DevOps pipeline. Here is a “stage” of the azure deploy pipeline – DeploySolr:
- stage: DeploySolr
  condition:  and(succeeded(), eq(variables['Build.SourceBranch'], 'refs/heads/stage))
  dependsOn: PrepareAndBuildArtifact
  displayName: Deploy solr to Stage
  jobs:
  - deployment: 'Deploy_Solr_Specs_to_Stage_AKS'
    pool:
      name: $(vmLocalImageName)
    environment: Stage
    strategy:
      runOnce:
        deploy:
          steps:
          - task: DownloadPipelineArtifact@2
            displayName: "Download Build Artifact"
            inputs:
              artifact: Sandbox.DevEx-$(Build.BuildNumber)
              targetPath: '$(System.ArtifactsDirectory)'
          - task: KubernetesManifest@0
            displayName: Bake Zookeeper
            name: 'bake_zookeper'
            inputs:
              action: 'bake'
              renderType: 'kustomize'
              kustomizationPath: '$(System.ArtifactsDirectory)/kubernetes/k8/stage/zookeeper'
          - task: KubernetesManifest@0
            displayName: Deploy Zookeeper
            inputs:
              action: 'deploy'
              kubernetesServiceConnection: '$(AKS_SERVICE_ENDPOINT)'
              namespace: 'solr'
              manifests: '$(bake_zookeper.manifestsBundle)'
          - task: KubernetesManifest@0
            displayName: Bake Solr
            name: 'bake_solr'
            inputs:
              action: 'bake'
              renderType: 'kustomize'
              kustomizationPath: '$(System.ArtifactsDirectory)/kubernetes/k8/stage/solr'
          - task: KubernetesManifest@0
            displayName: Deploy Solr
            inputs:
              action: 'deploy'
              kubernetesServiceConnection: '$(AKS_SERVICE_ENDPOINT)'
              namespace: 'solr'
              manifests: '$(bake_solr.manifestsBundle)'
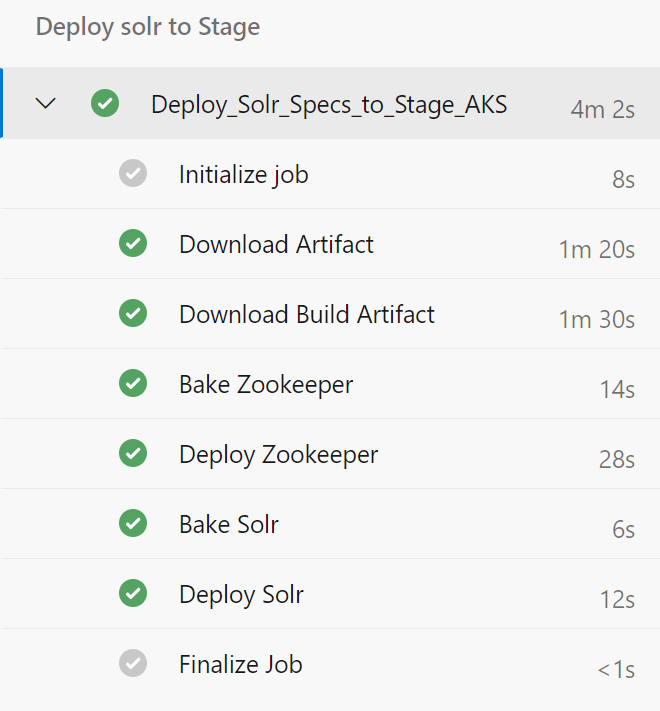
Lovely! Let’s run the pipeline:
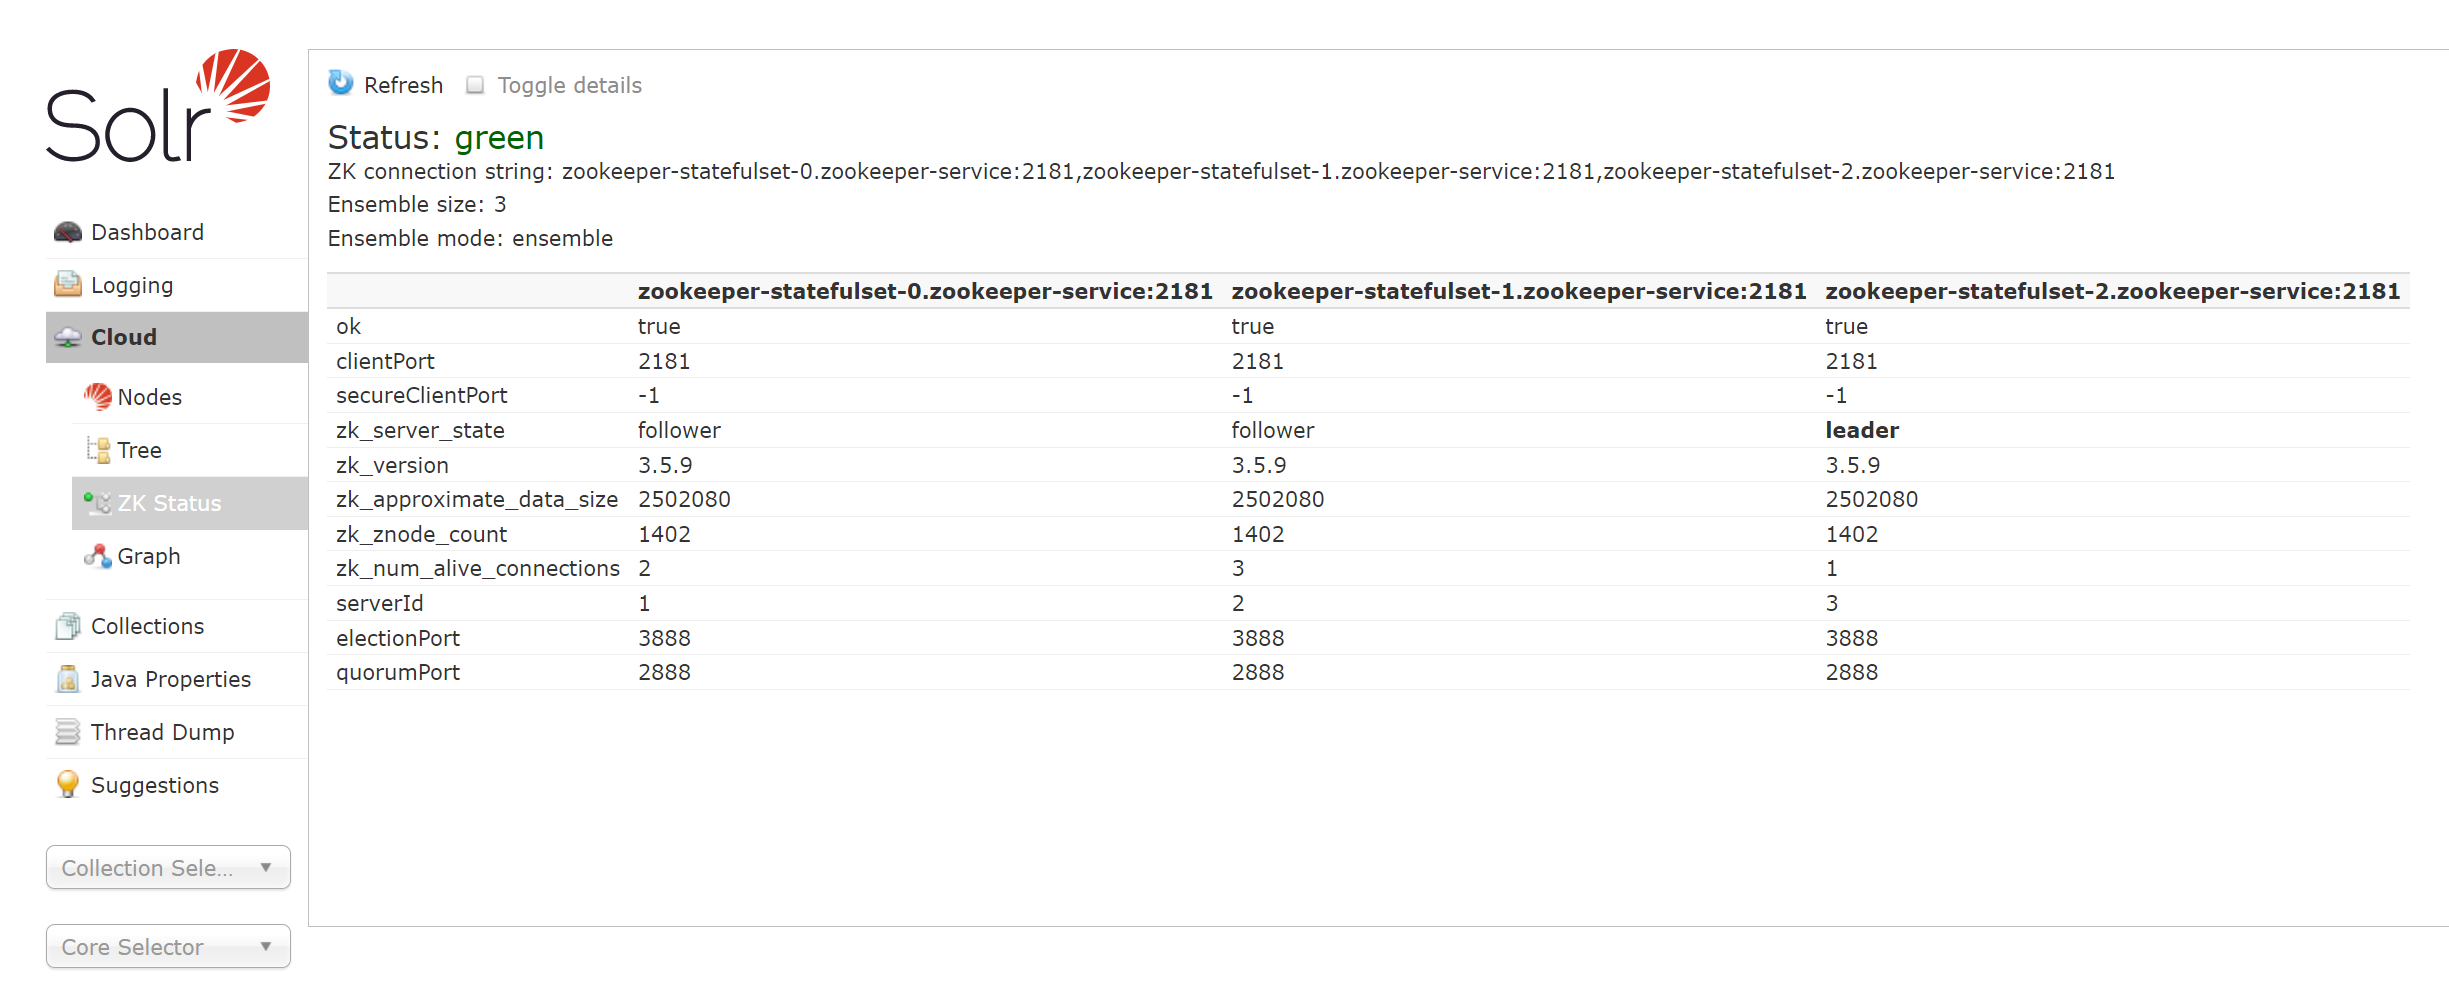
Great! Let’s have a look in Lens and see how SolrCloud is doing 🙂
We will locate the new solr-service and click on the “port link”. The service is the “SolrCloud endpoint” for the other pods/containers. For instance, the solr connectionstring for CM will be http://solr-service:8983/solr
Lens is magic, it allows you to access the internal solr-service. By clicking the service port link it will trigger an automatic port-forward and your browser will be opened to a forwarded port on your localhost.

And yes, it looks fine 🙂
Last part! Time to create the collections and the configurations. Instead of going for the “init container/pod” approach, we will create a Kubernetes Job and run the Powershell scripts from there. Here is the job – init-solr.yaml:
apiVersion: batch/v1
kind: Job
metadata:
  name: init-solr-job
spec:
  template:
    metadata:
      name: init-solr-job
    spec:
      containers:
      - name: solr-init
        image: sandbox.azurecr.io/sandbox-linux-solr-8.4.0:stage
        command: ["pwsh","-F", "/home/cloud/MakeCollections.ps1"]
        args:
           - "8983"
           - "solr-service"
      restartPolicy: Never
  backoffLimit: 4
Cool 🙂 Let’s create the job in our Kubernetes cluster, we will do this with kubectl:
kubectl apply -f init-solr.yaml
Lens, the best tool ever, will allow us to see the logs for the running job:
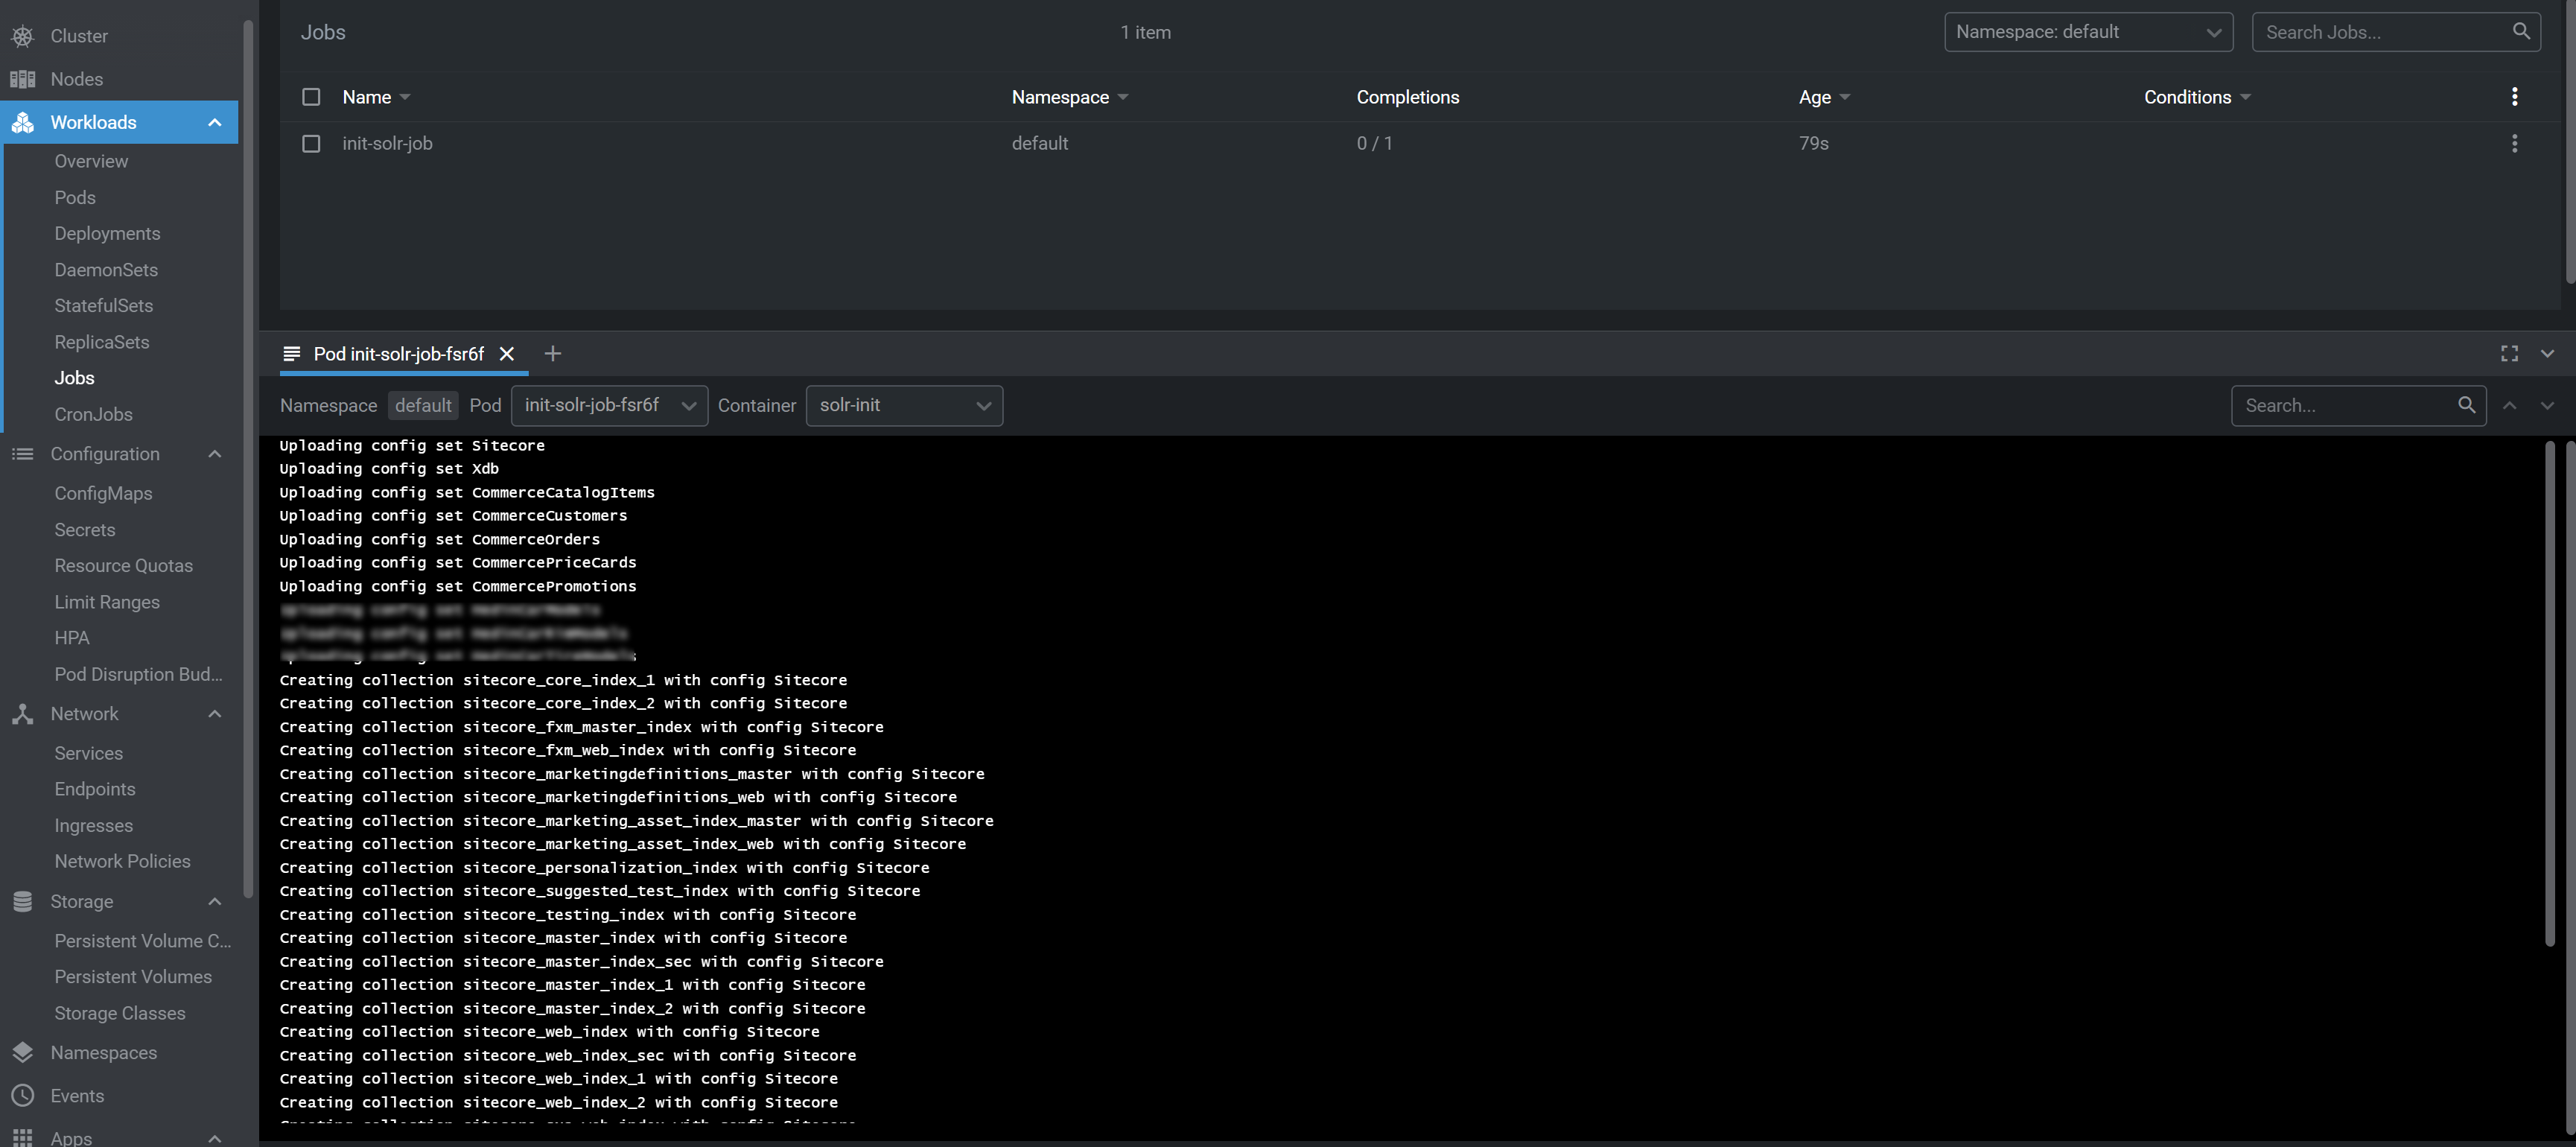
Success! Collections and configurations are in place 🙂

I really enjoyed this exercise! Running Powershell on Linux containers/pods works great and the use of Kubernetes jobs is really powerful, I see great potential here. Instead of going for the “init image” approach, why not use Kubernetes jobs instead 😉
That’s all for now folks 😊
